Costs of Travel #5 – Real Travel for $50 Per Day, a Summary of Asia & the Entire Trip (by Nathan)

Polaroid taken of us at a party in HK
I present to you the final installment of our “Costs of Travel” series! Quick recap: the last four months of our trip were evenly split between Southeast Asia (including Thailand, Cambodia, Vietnam and Laos) and China. Our final city was Hong Kong, a grand finale to our enormous adventure. We travelled for 410 days and were able to do it for $50 per day. This post will look at the last four months as well as the trip as a whole to provide some advice on how you can get started on your own world tour.

(You may notice that the entire trip shows up as $61.60 a day, but this will be explained later on. We found a way to save at least $11 per day)
Our trip as analyzed through the Costs of Travel thus far:
- Costs of Travel #1: Blowing Up a Budget in South America
- Costs of Travel #2: Finding Our Bearings in the US of A
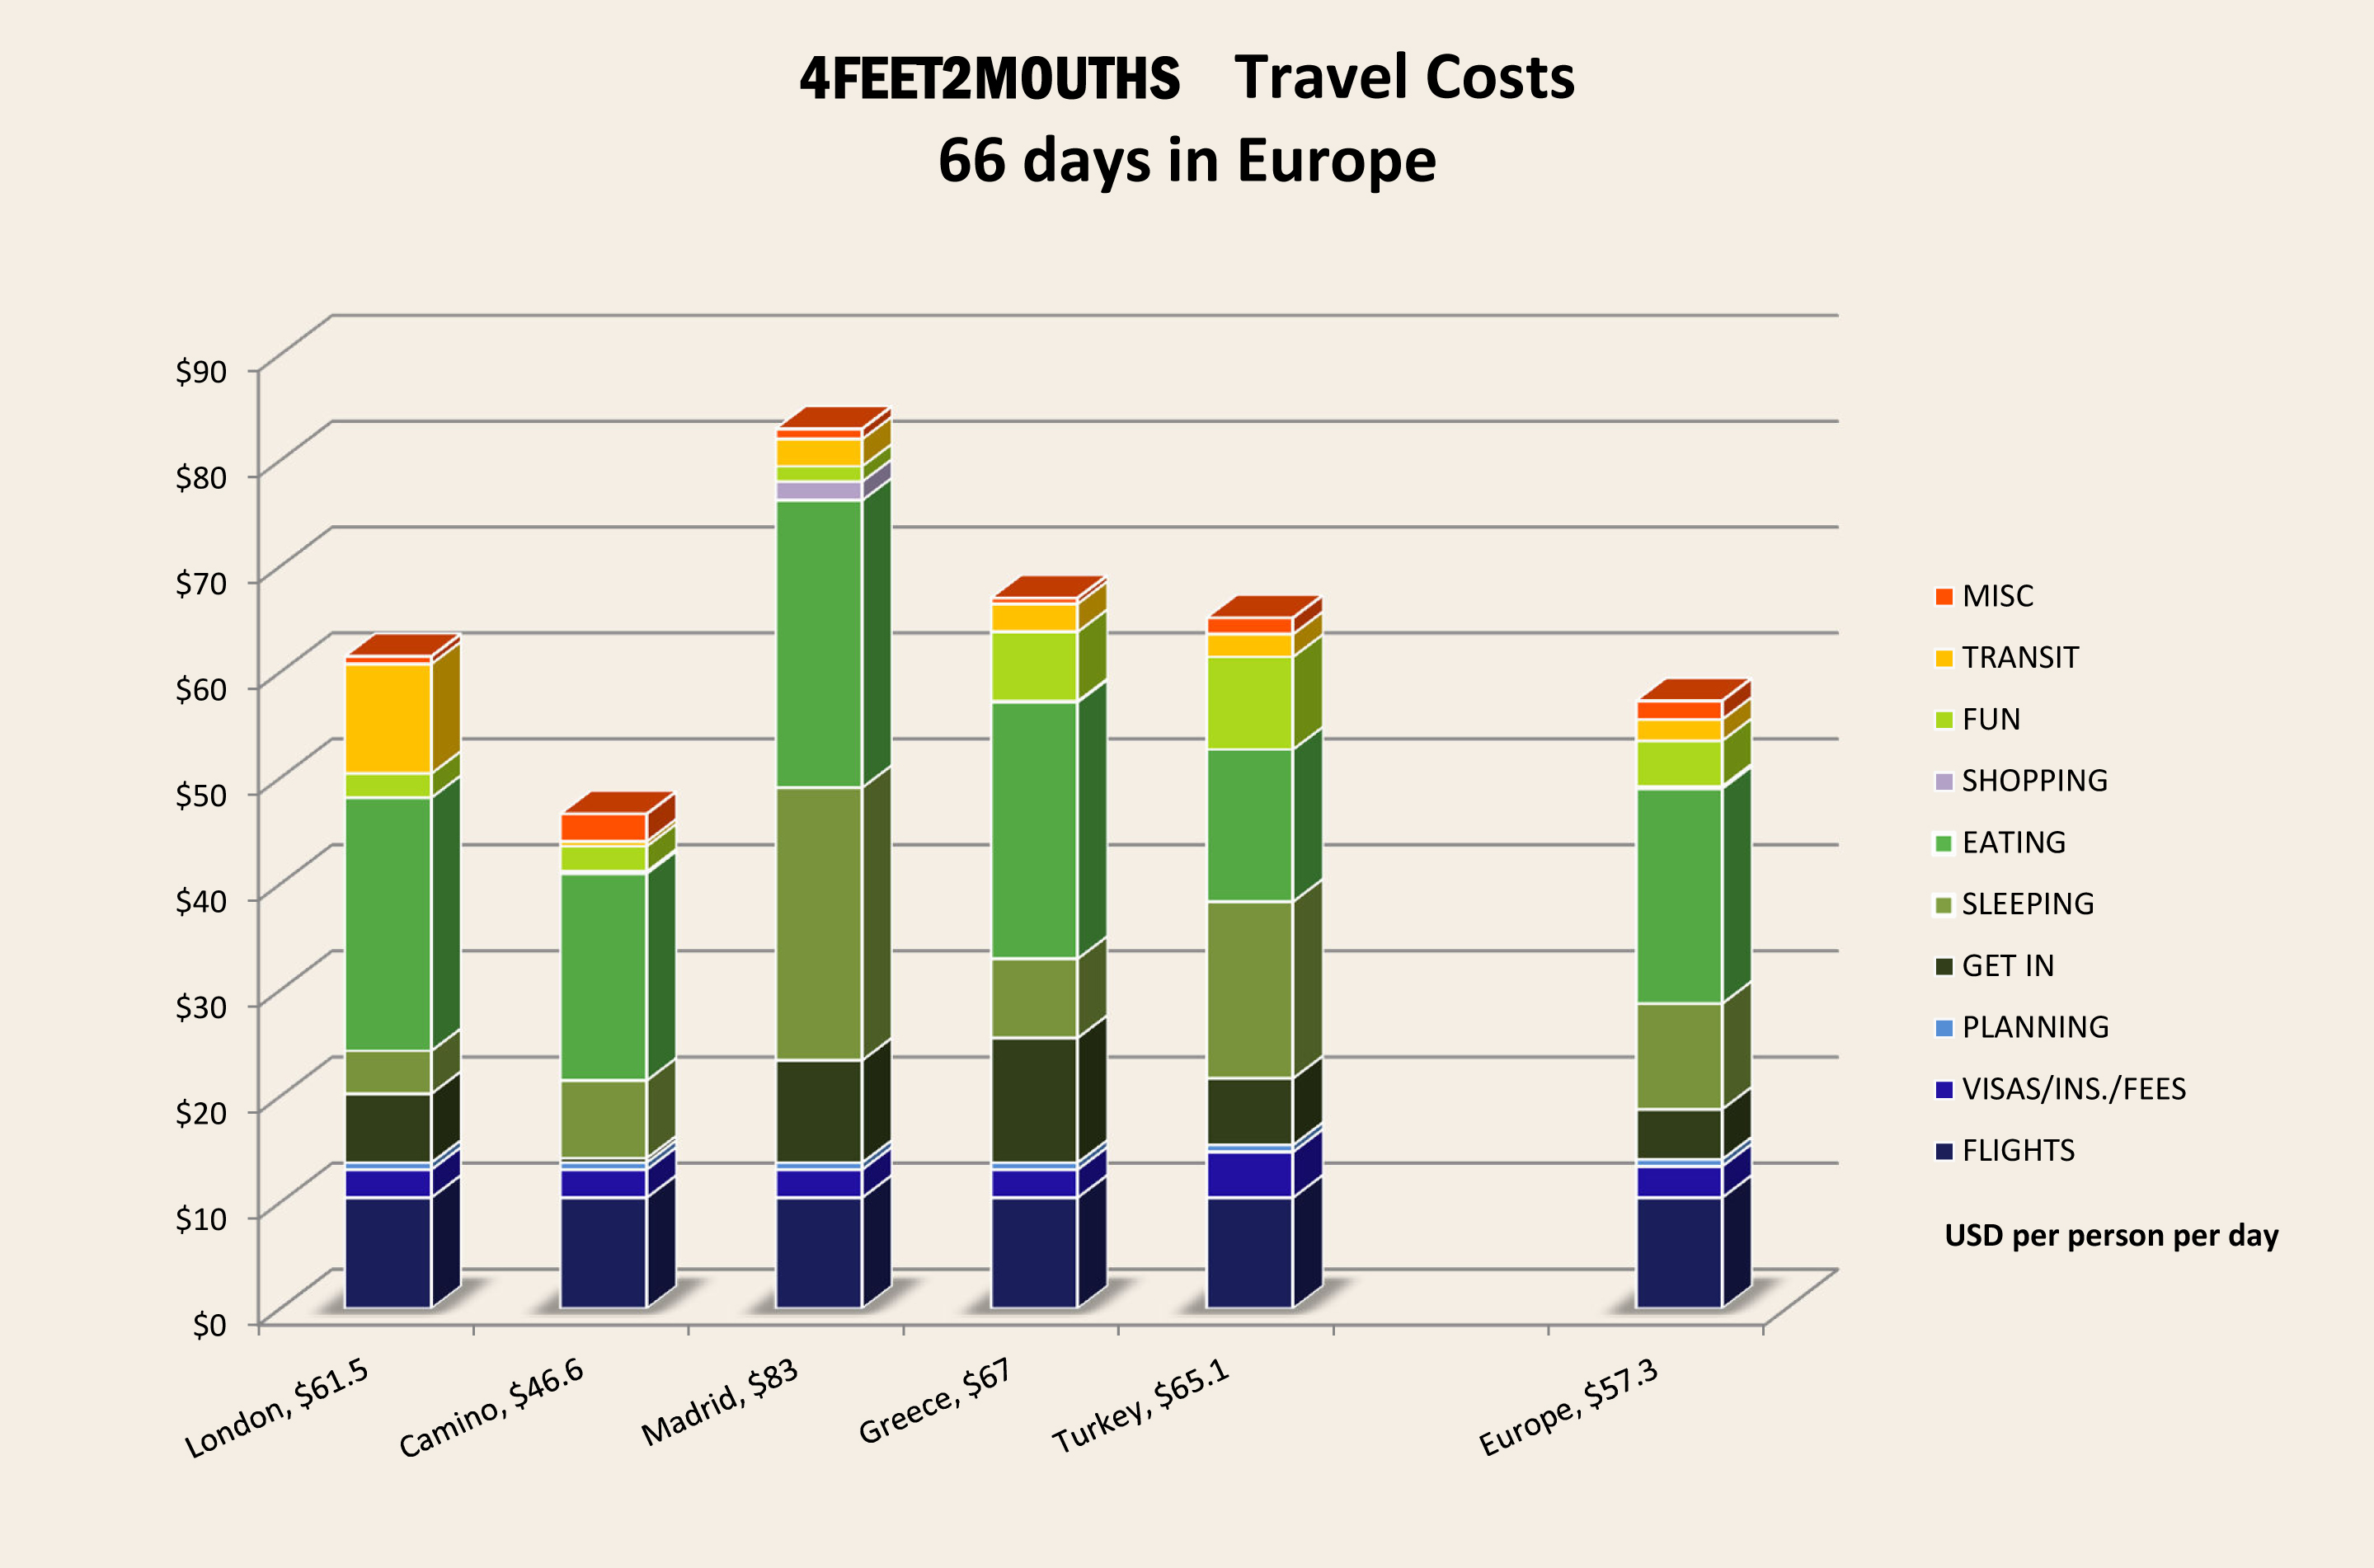
- Costs of Travel #3: Highs and Lows in Europe & India
- Trip Tip #4: How to Finance a Year of Travel
All this travel definitely made a dent on our pocket book. We toured 18 countries and explored everything from jungles and mountaintops to pristine beaches and without doubt, it was worth it. We learned some financial budgeting lessons in South America, we got back on track in the United States and we continued our love of travel into Europe and India.

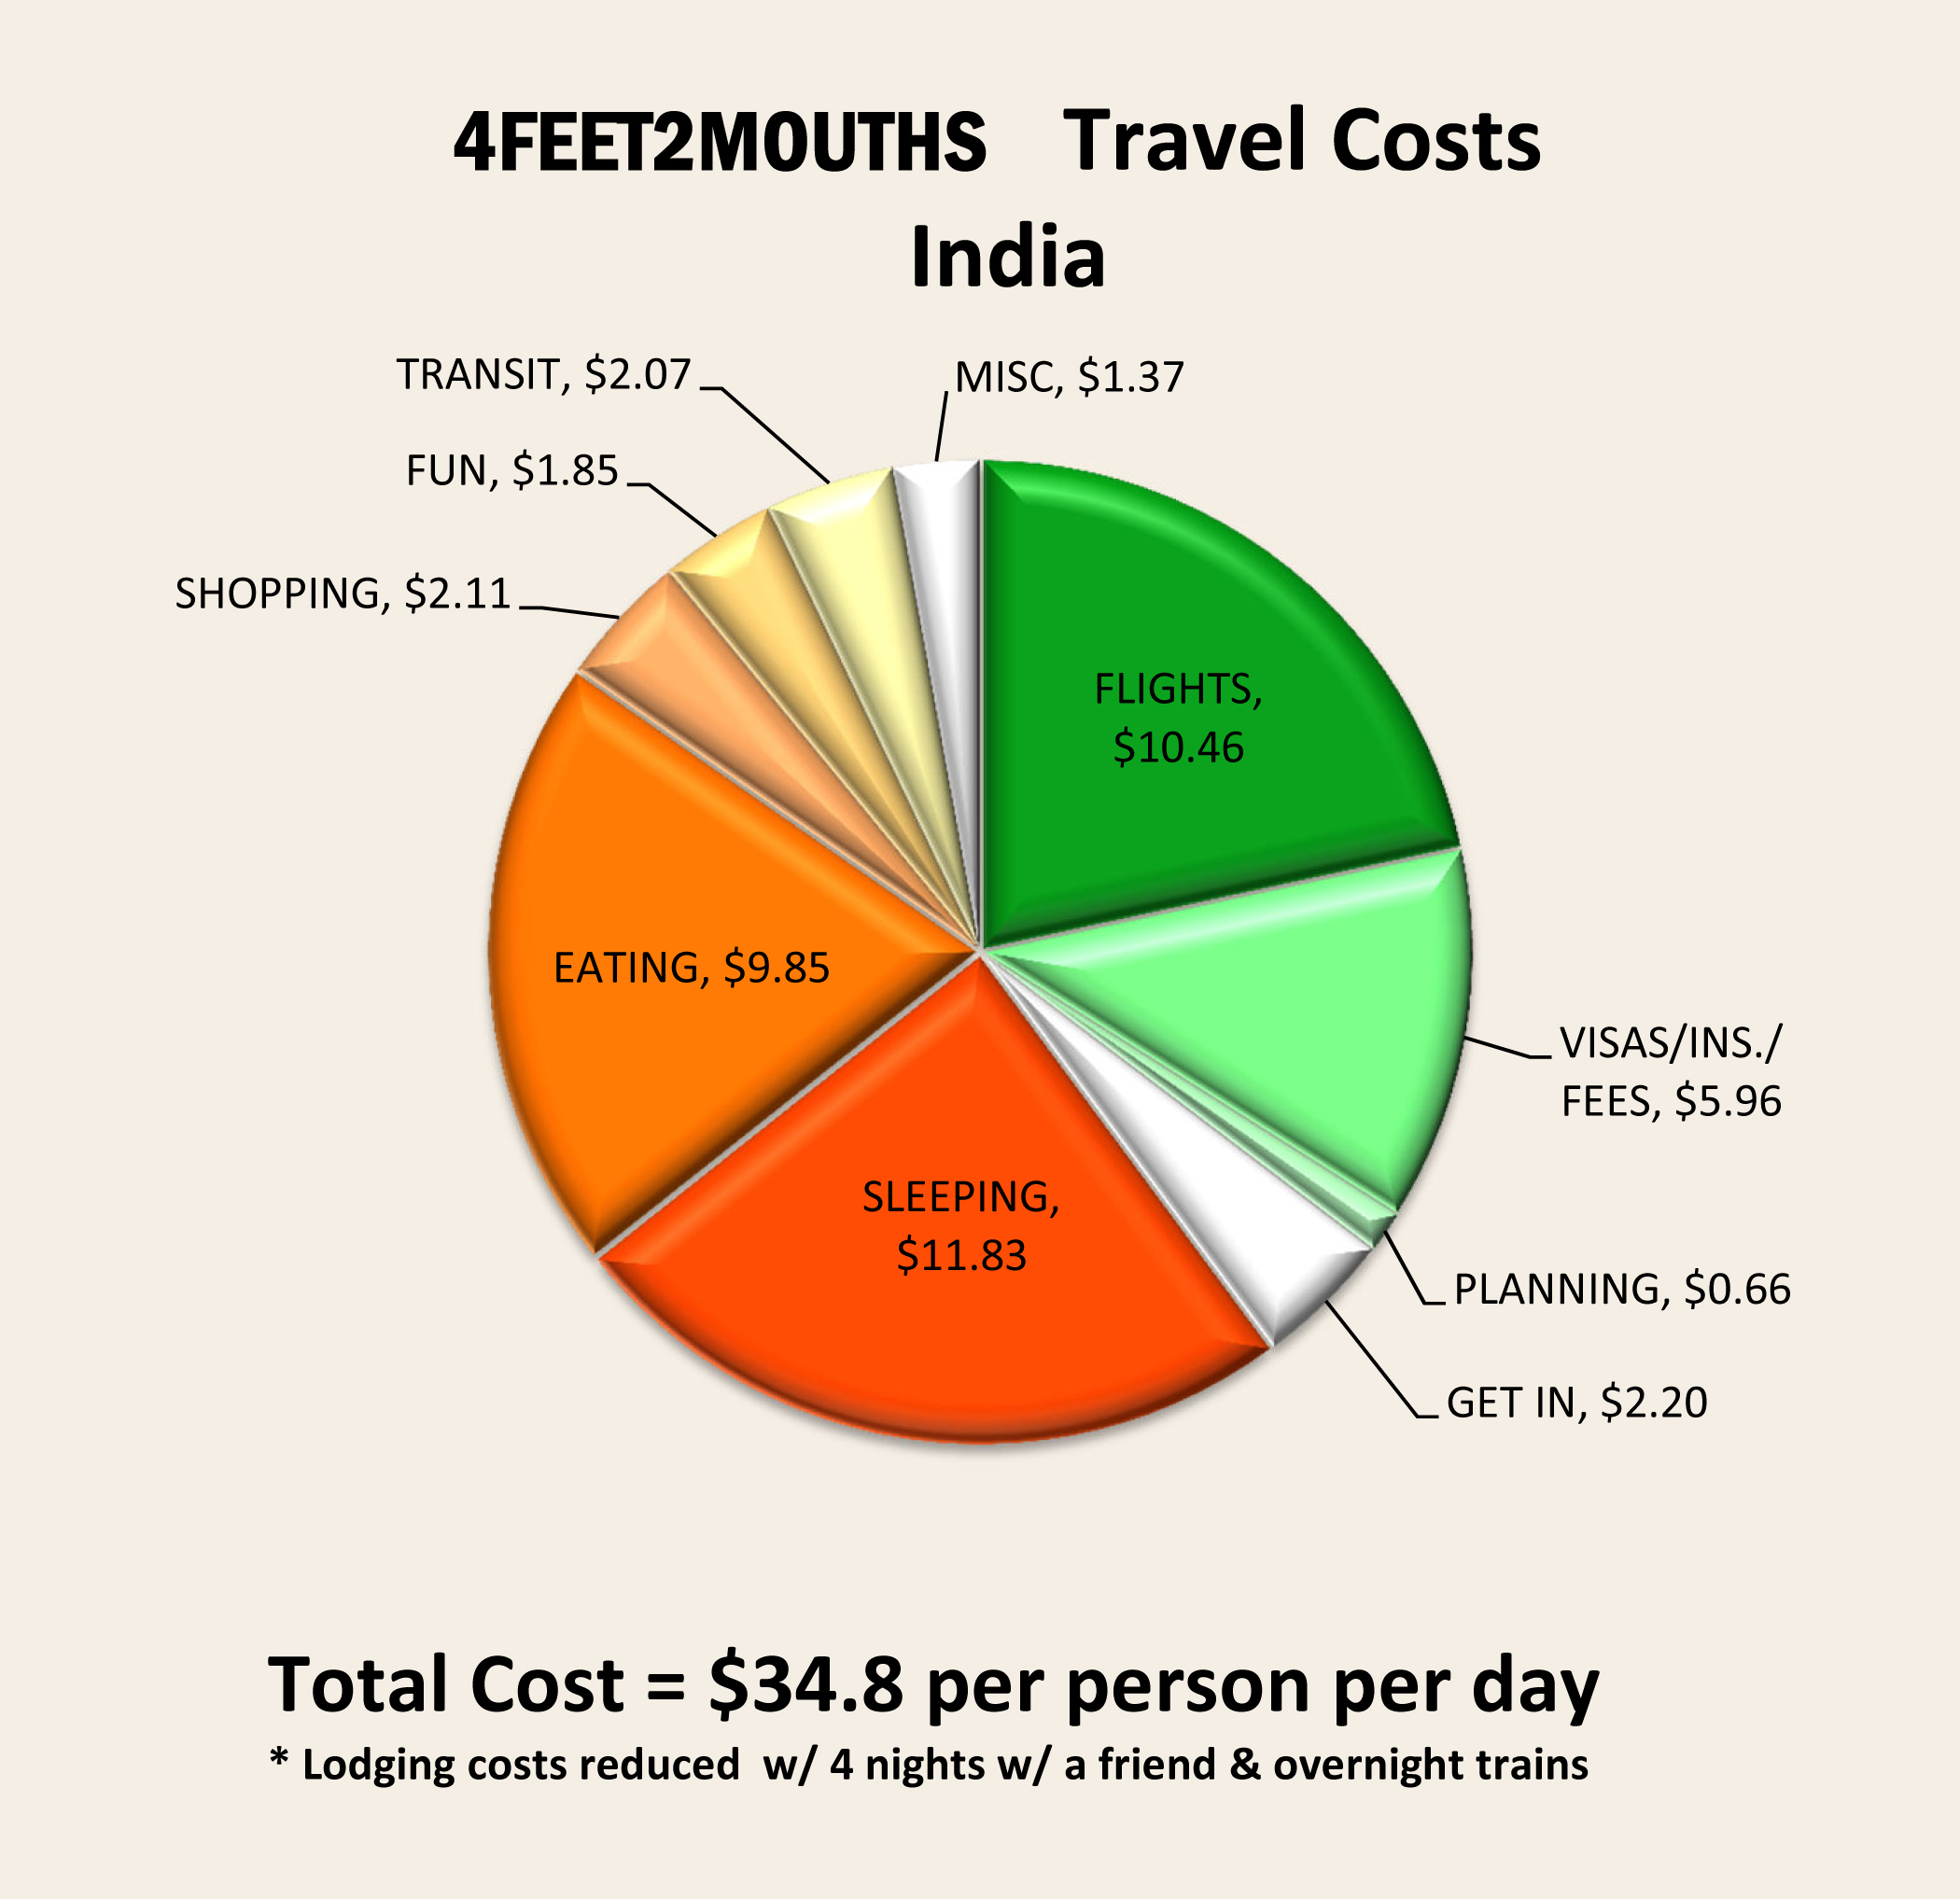
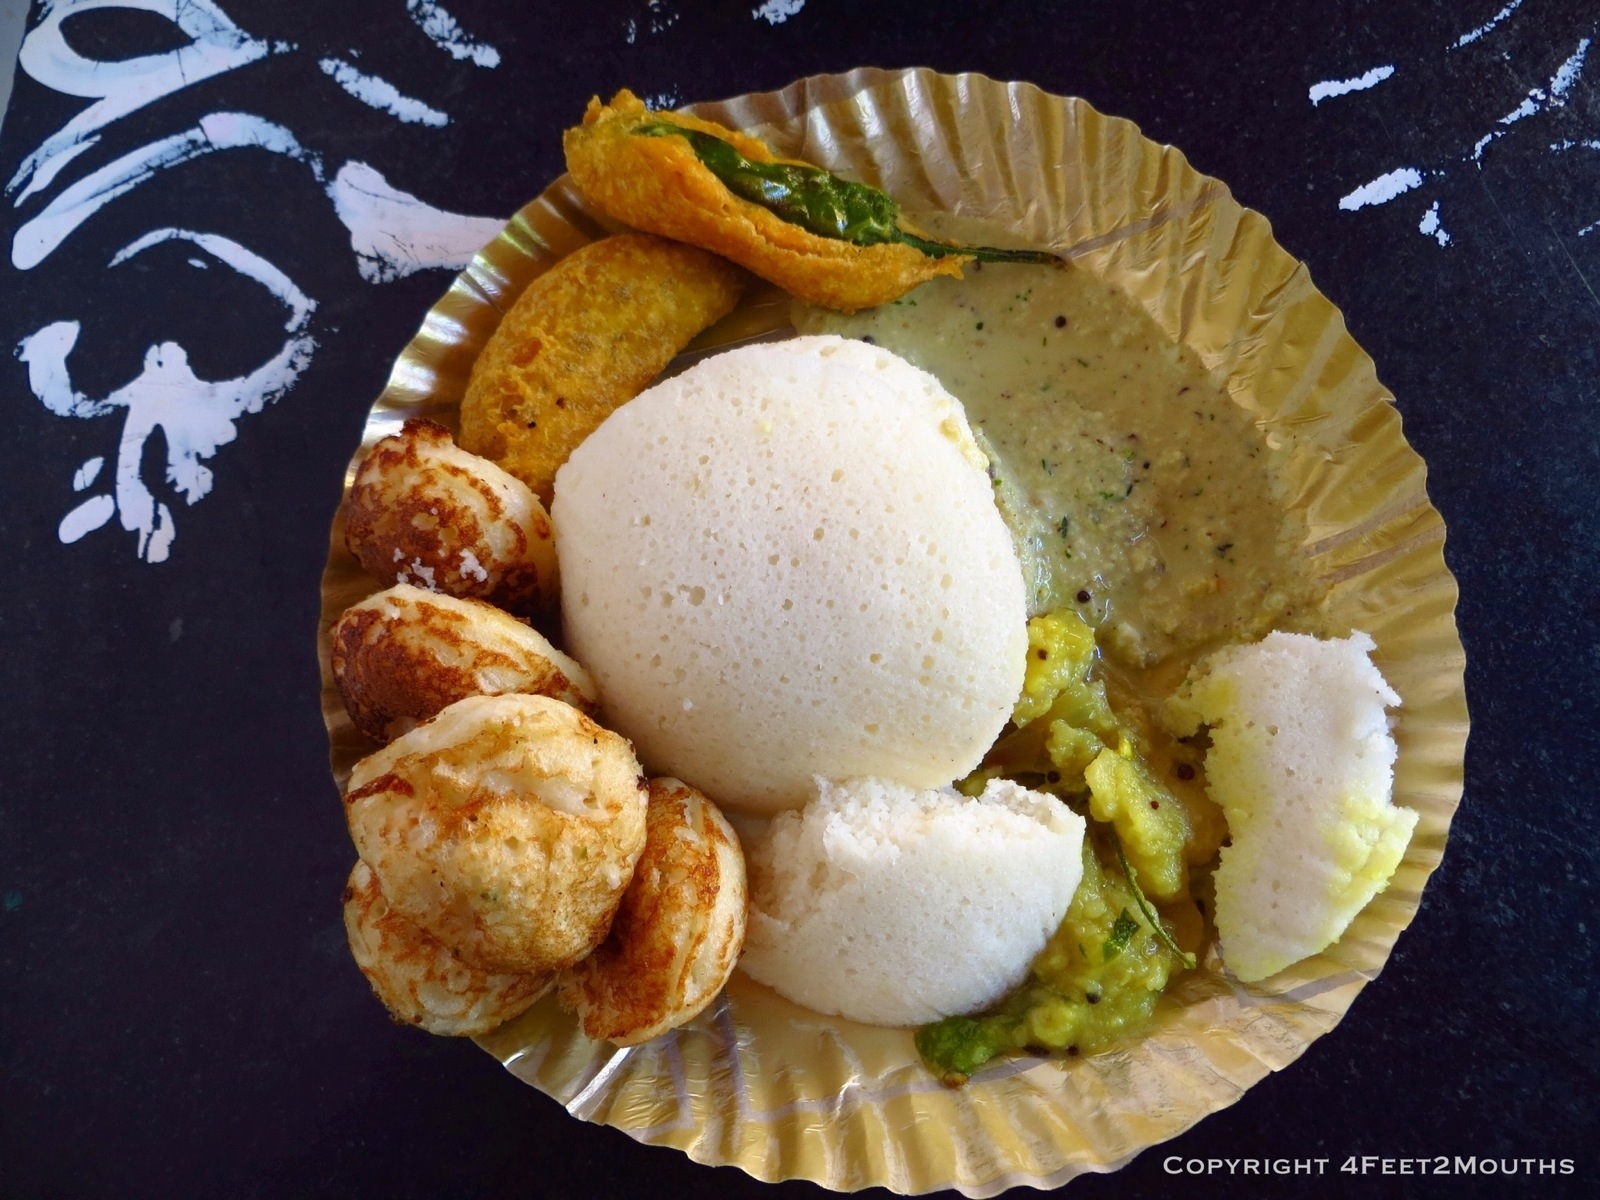
It is funny, but Southeast Asia would only feel expensive after arriving from a place like India which is what we did. India is incredibly inexpensive; a few dollars and we were eating like kings. I am still amazed that we were eating dosas and idli every morning for 50 cents! Where else can you travel to a country for less than $35 per day with flights and visas? We landed in Bangkok feeling a little awkward in the modernity of a city that is so starkly different from New Delhi. The contrasts between India and Thailand were so vivid that we constantly grappled in our first few days to readjust to Thailand. What we quickly learned was that everything in Southeast Asia was twice the price of India, but even still everything was very affordable.
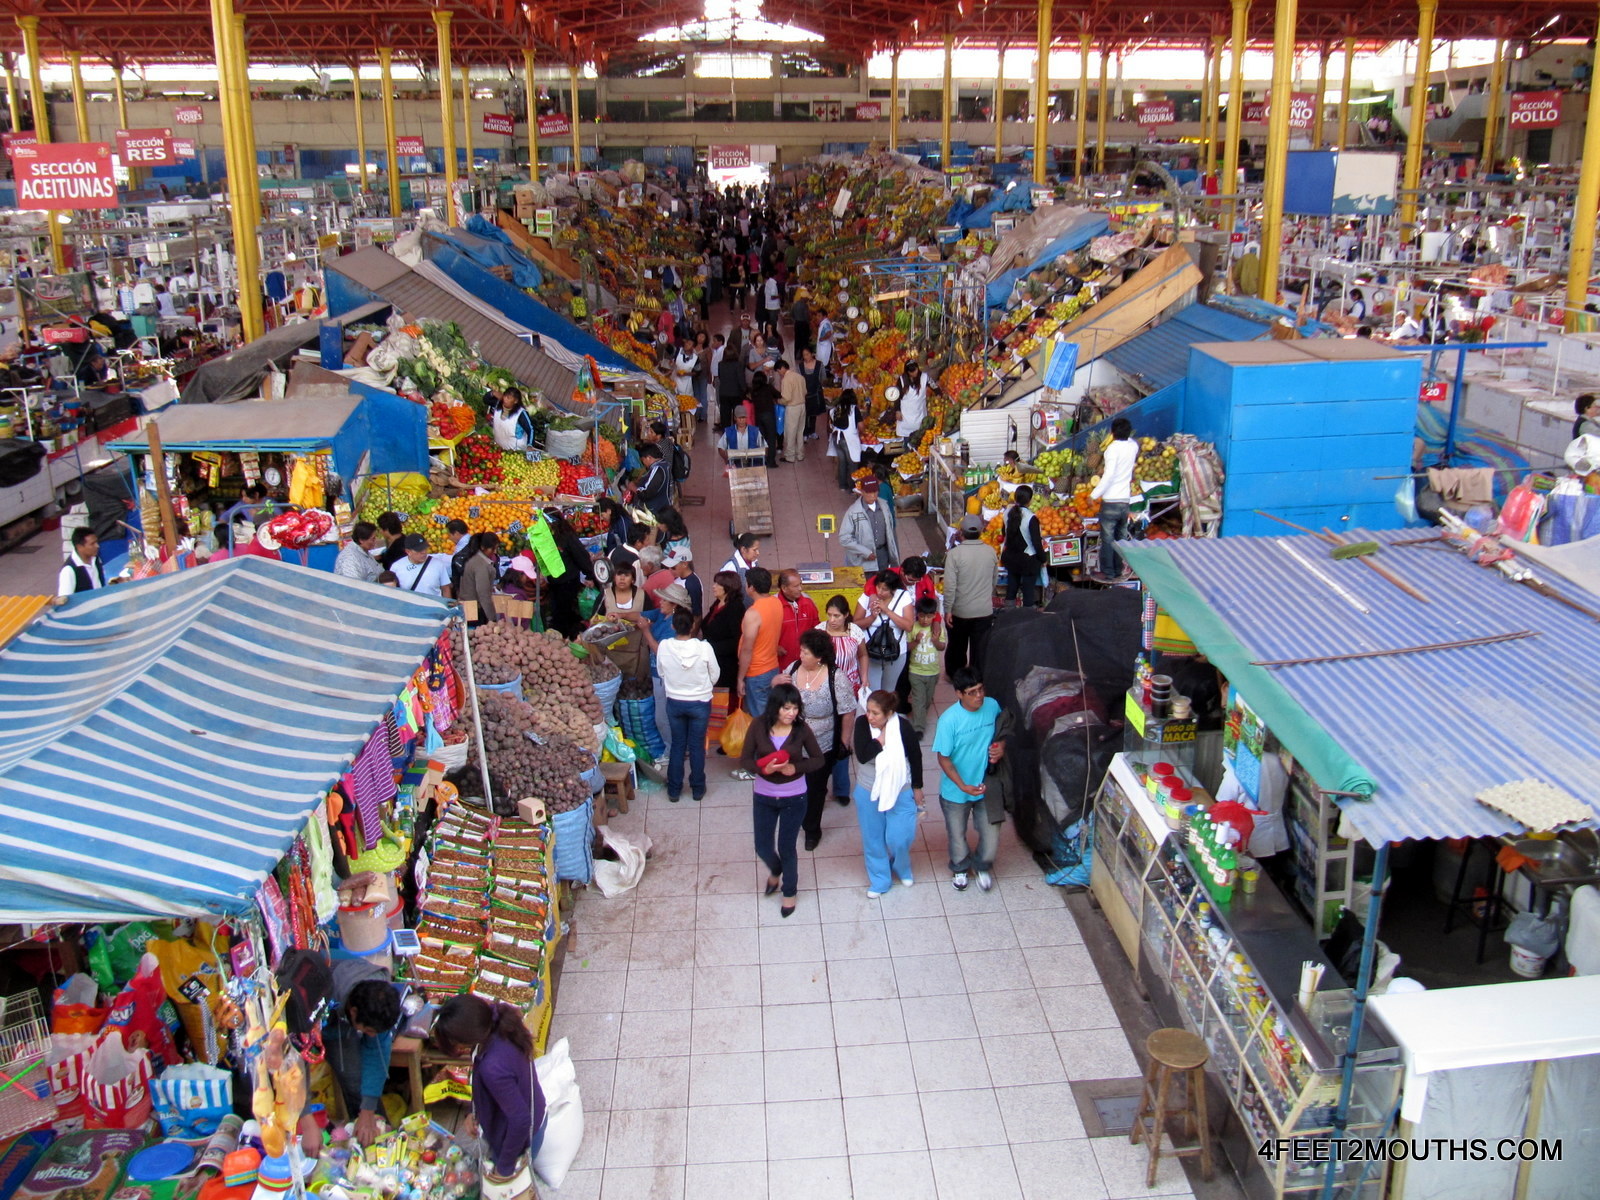
Overall, the costs in the various Southeast Asian countries were very similar and our daily budget was pretty stable at $47 per person per day. Hostels and hotels were pretty standard at $6-$11 per day and food $7-$9. That means we were getting all of our basic needs met for $16 per person per day on average. We did find that every Southeast Asian country had some relatively expensive excursion or activity that we couldn’t pass up: scuba diving, Ankor Wat, Halong Bay and jungle trekking were all wonderful and essential experiences, but they bloated the “Fun” category of our budget. We also noticed that transportation in the region, both between cities (the Get In category) and within cities (Transit) can easily be done for under $5 per day. We bused everywhere, with many overnight buses, and I recommend that as the most accessible and comfortable method of transportation.
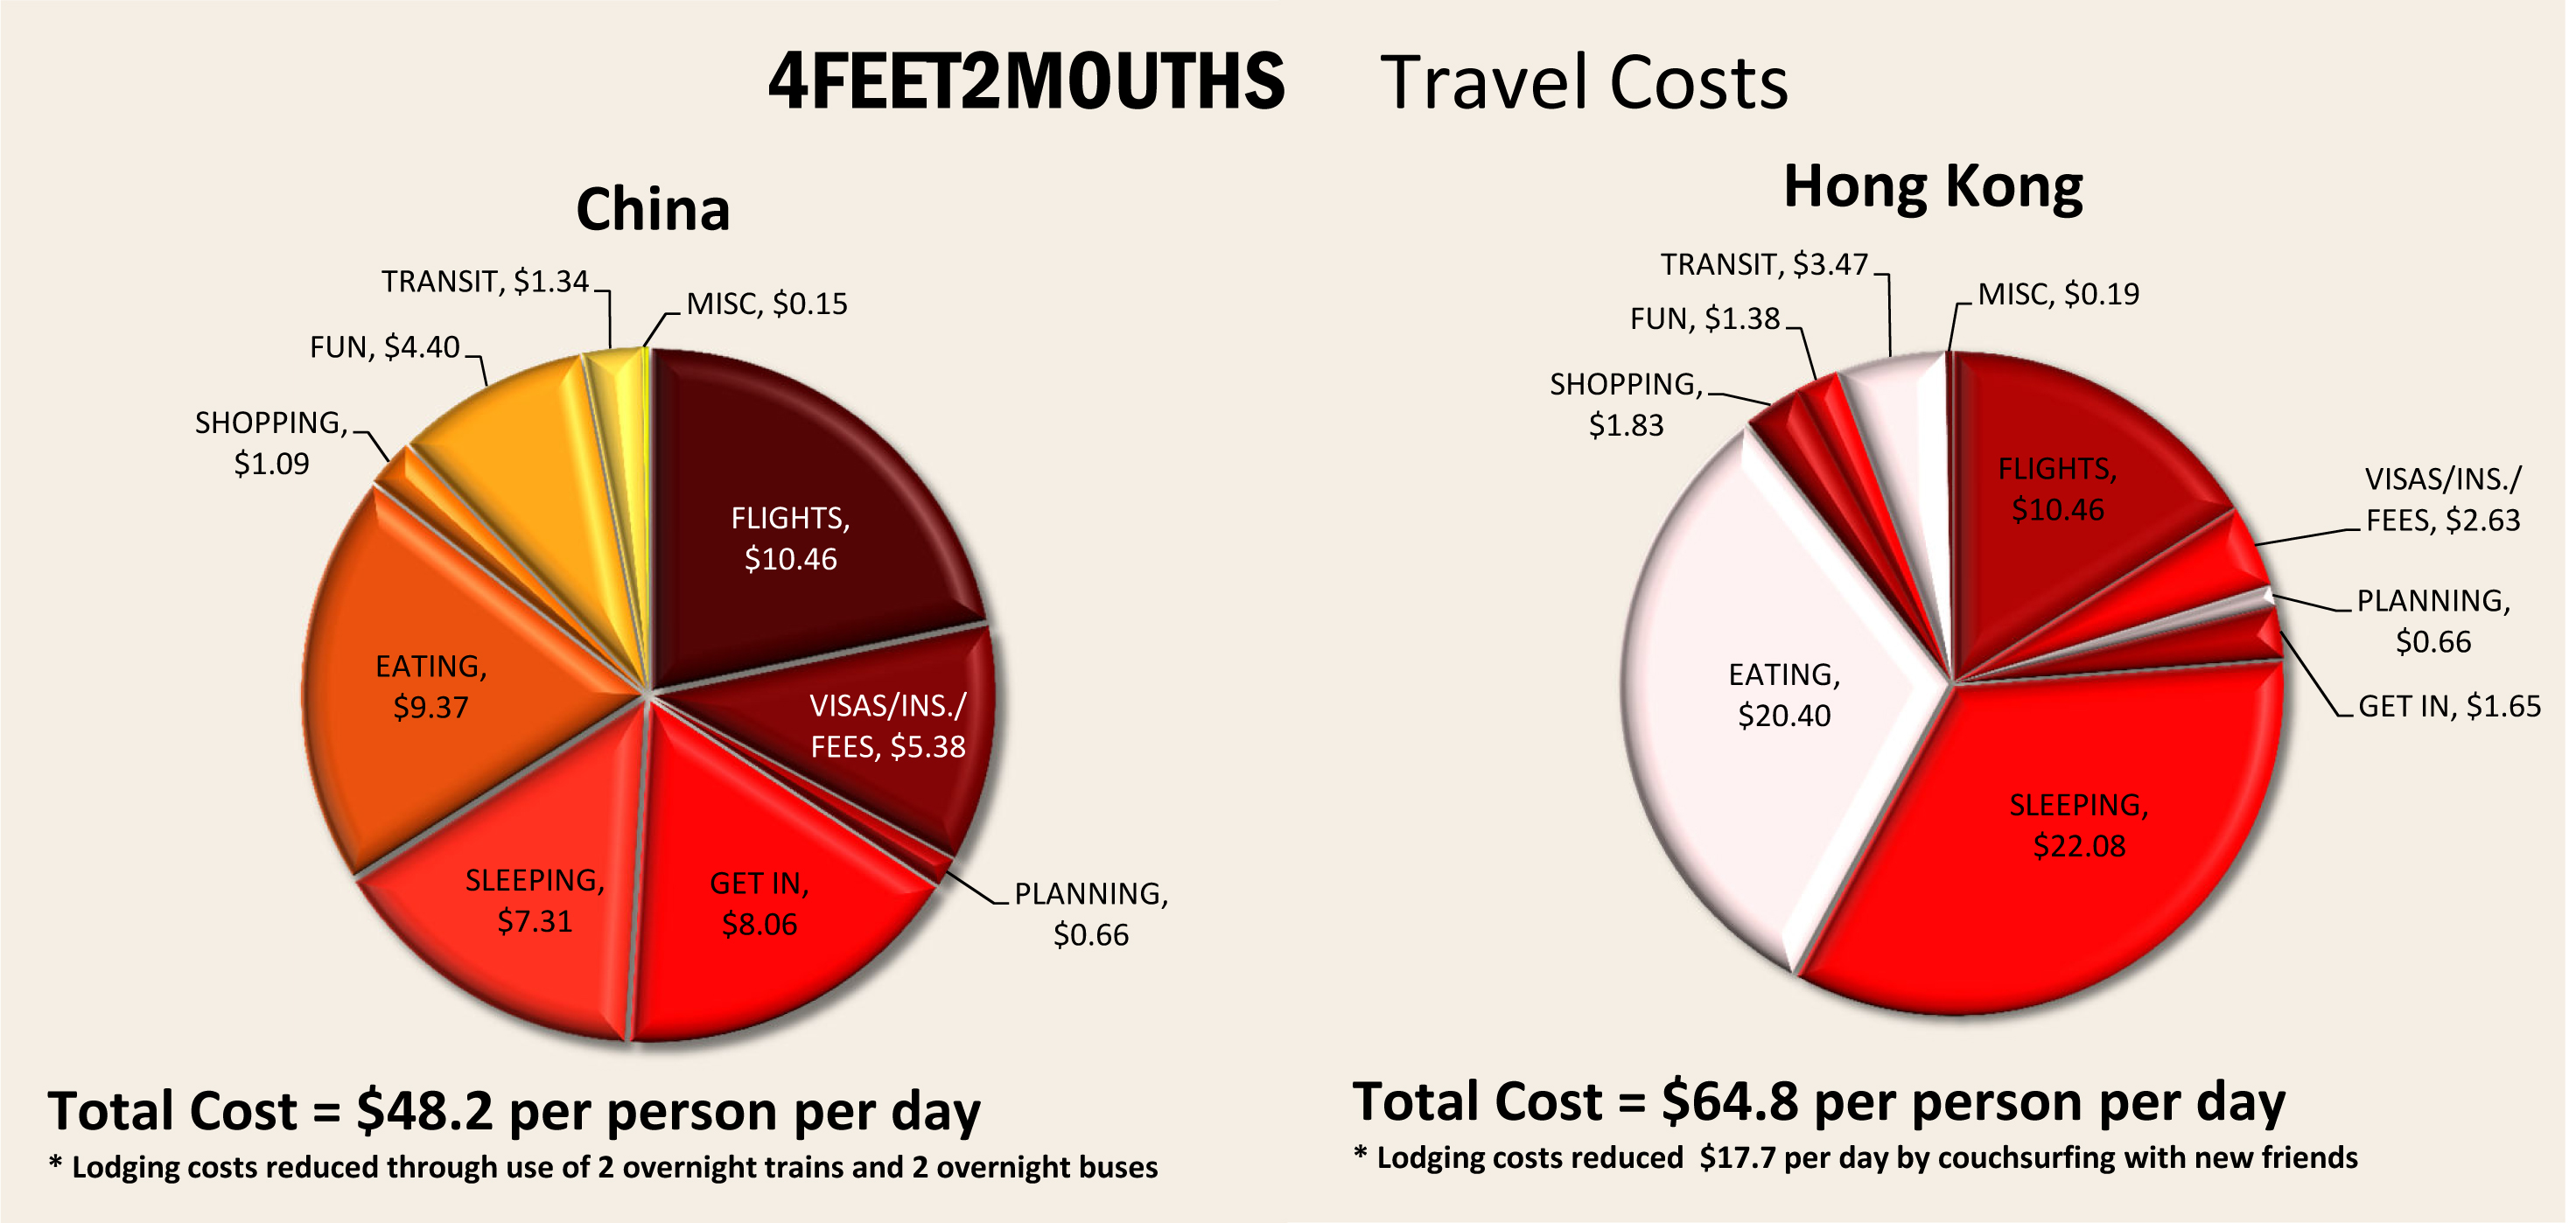
When we arrived in China it somehow felt more expensive to us than SE Asia. But when finally sitting down and looking at the numbers it was in fact that same cost – $48 per person per day. It felt like we were constantly being charged park entrance fees, but those costs rarely compared to the “Fun” costs we had in SE Asia. A big savings was that we were touring China during winter, which meant that many of the boat cruises and beach adventure activities we were doing in SE Asia were not possible. It was the buses and trains between cities that were roughly twice the price in China and we typically spent $8 each per day on that transportation, whereas transit within cities was excellent at only $1.34 per day. All in all, China was extremely affordable. The food, sights and adventure were some of our best memories.

Rainbow currencies of Hong Kong

Excellent meals at Spring Deer and Da Ping Huo
Hong Kong is one of our favorite cities. We wanted to spend some time there, but at the same time not bust our budget that we had worked so hard to tame. Hong Kong is one of those cities that must be balanced with one of the more affordable ones. Planning a trip like ours requires a balance of the “India’s” and the “UK’s;” longer periods of time in the cheap countries provides for a few days in the expensive ones. After three and a half months SE Asia and China we were ready for a world-class city. Everything in Hong Kong is about twice the price of China and lodging is quadruple. We did some pre-planning and found a few friends to host us on Couchsurfing. It is possible to eat in Hong Kong for under $10 per day, but Hong Kong has one of the most eclectic restaurant scenes in the world so it is worth it to splurge a little. And as many of you know, food was a quintessential reason for our travel adventures. Even with succulent visits to Spring Deer and Da Ping Huo we were still able to reach our budget goals.

South America was an eye-opener for us; $96 per person per day was not sustainable for a year of travel. We re-assessed, adjusted and planned a seven month around-the-world trip (Europe to Asia) that successfully only cost $50.5 per day. We learned that South America is inherently expensive because flights are costly, reciprocity visa fees are prevalent and food and lodging is just not that cheap. Our revised plan did in fact find a balance of activities, sights and awesome food for an affordable cost. One reality that we have not addressed was that investing our travel money actually funded major portions of our trip.

One of the main advice points of Trip Tip #4 was to in invest your savings before embarking on your around-the-world trip. I have created a little scenario to prove my point. Suppose I set aside $25,000 each for Carmen and me about one year before we embarked on our trip. This money would be spent in increments during the trip so would have to be accessible. In this scheme we invested in one of the big Dow companies or in the S&P 500 (an index of the top 500 US companies) that is likely to slowly grow, but not sink. I ran a scenario where $5,000 was withdrawn at the start of the trip and every three months during the trip. I chose a selection of companies that everyone has heard of: Disney, Verizon, Exxon Mobile and CocaCola. If you have a resistance to buying stock, then you are missing out on all the companies that are profiting off of you. Truth: you are not off the grid. I like to think that I am taking advantage of globalization and the world reach of corporate America by allowing these companies to fund my travel of the globe. I take my portion of their profits and reinvest it in the local communities I visit by buying food at a street cart or staying in a family-owned hotel.
My investment scenario shows some amazing findings: two years after deciding to travel and investing the money resulted in thousands of dollars in free money. Suppose in our investing scenario we did not invest in Disney, but we did earn $4,500 over the course of two years; over 410 days of travel we would have saved $11 per day! Carmen and I did not invest in any of these companies, and I must remind you that there is risks involved in investing, so please research every company thoroughly before you float your life savings on stocks.

So we did it! Even though we were spending $96 a day in South America, we balanced our trip with some more inexpensive places like the Camino de Santiago, India and SE Asia. We invested our travel money along the way and pulled it out as we needed it. Therefore, the $61.60 a day we spent minus the $11 in investment earnings brought us to our goal. The end result, 410 days, 4 continents, 18 countries at $50.6 per day.
Check out all of our nerdy fun pie charts here:
-

- Argentina
-

- Uruguay
-

- Chile
-

- Brazil
-

- Bolivia
-

- Peru
-

- S.Amer.
-
- LA
-

- G.Canyon
-

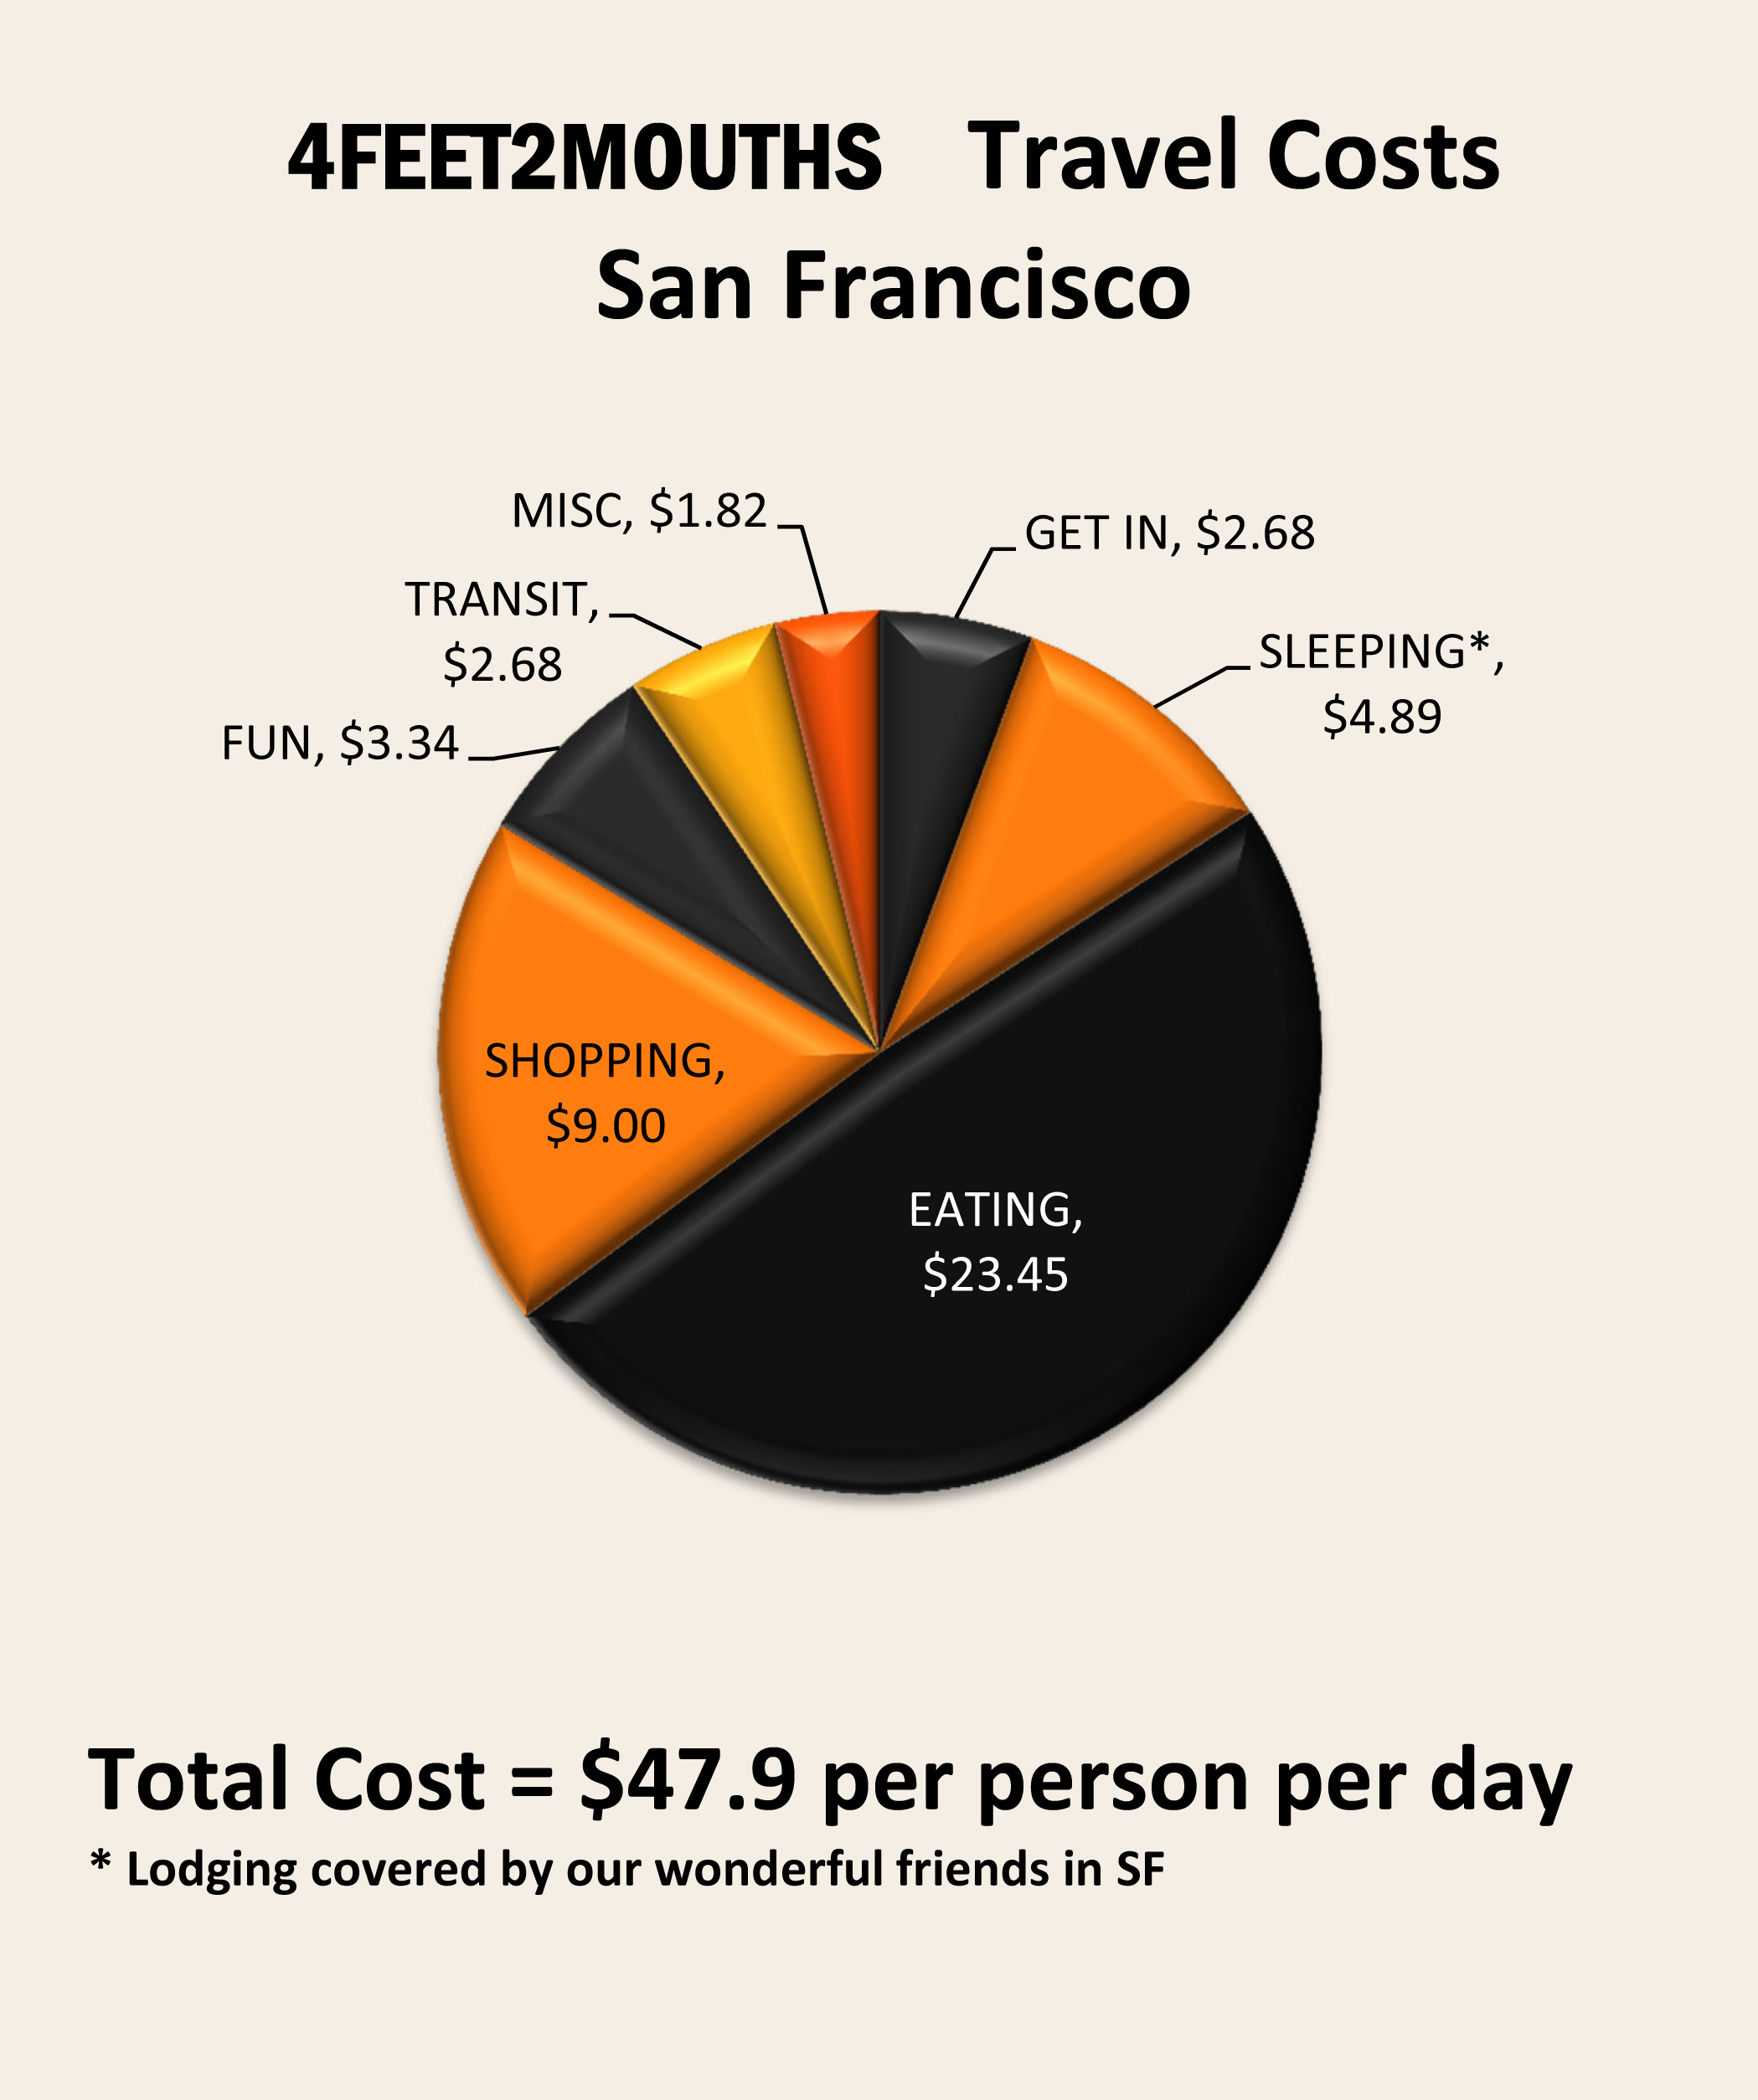
- SF
-

- New York
-

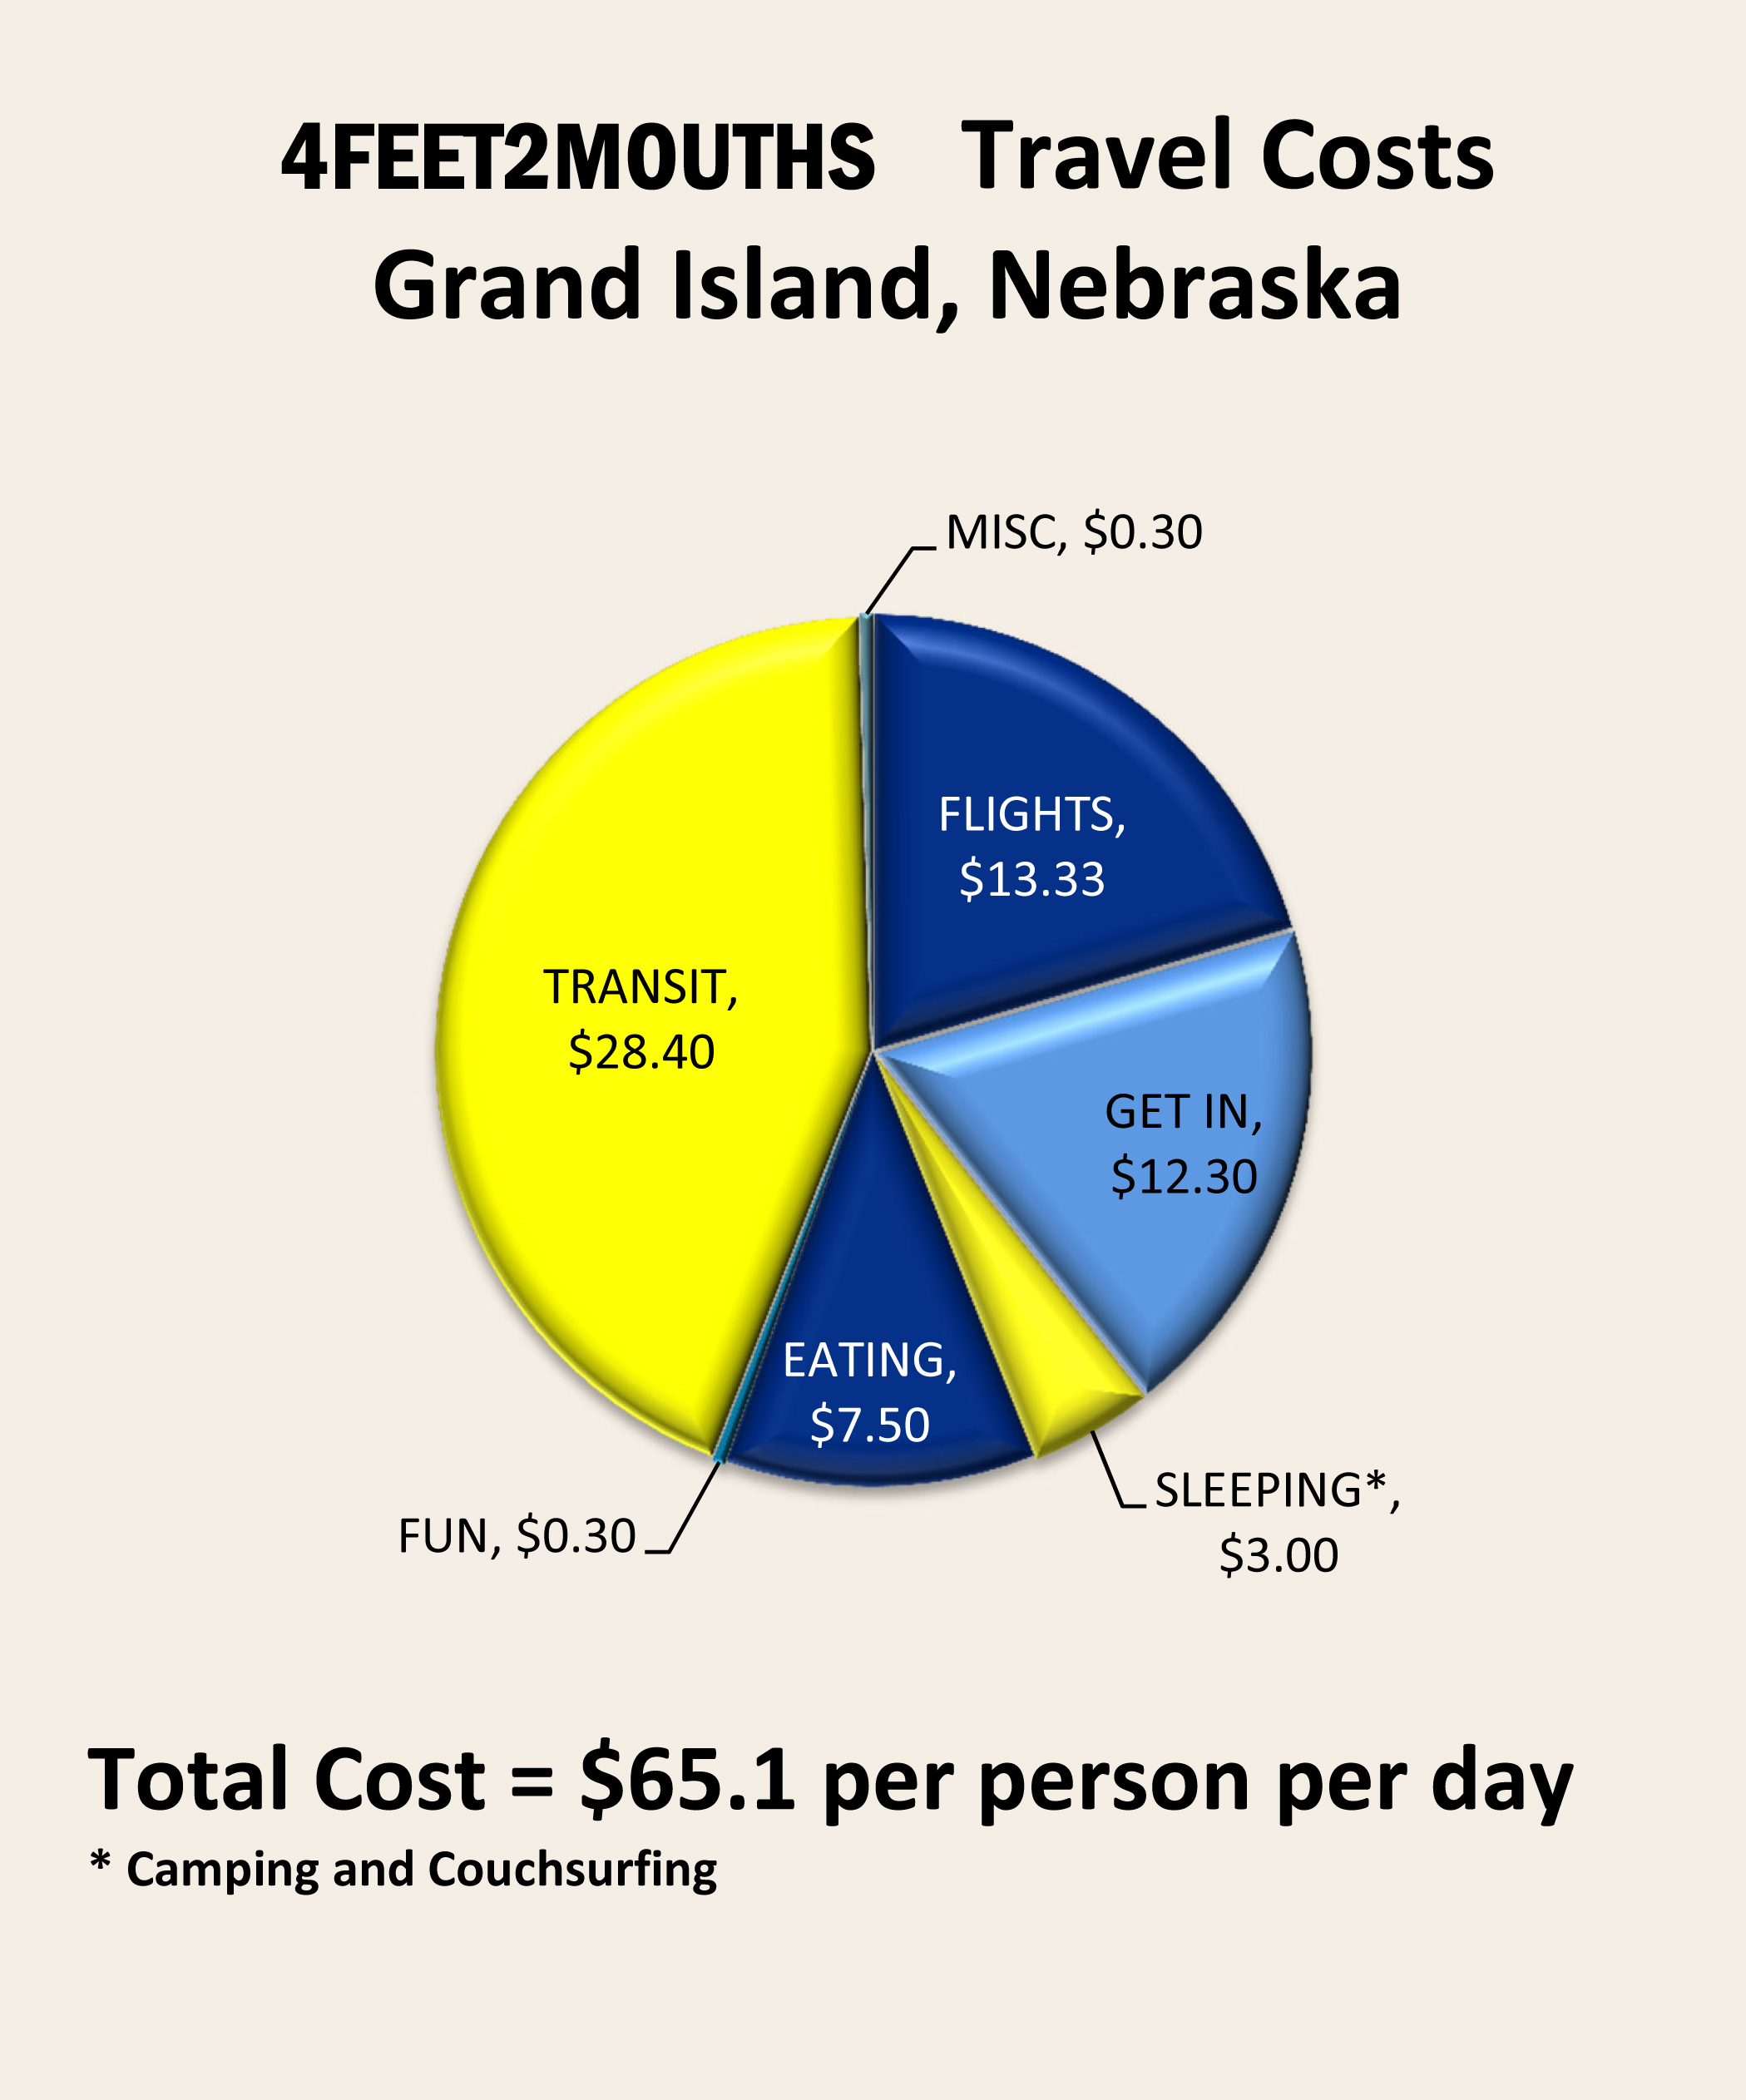
- Nebraska
-

- Chicago
-

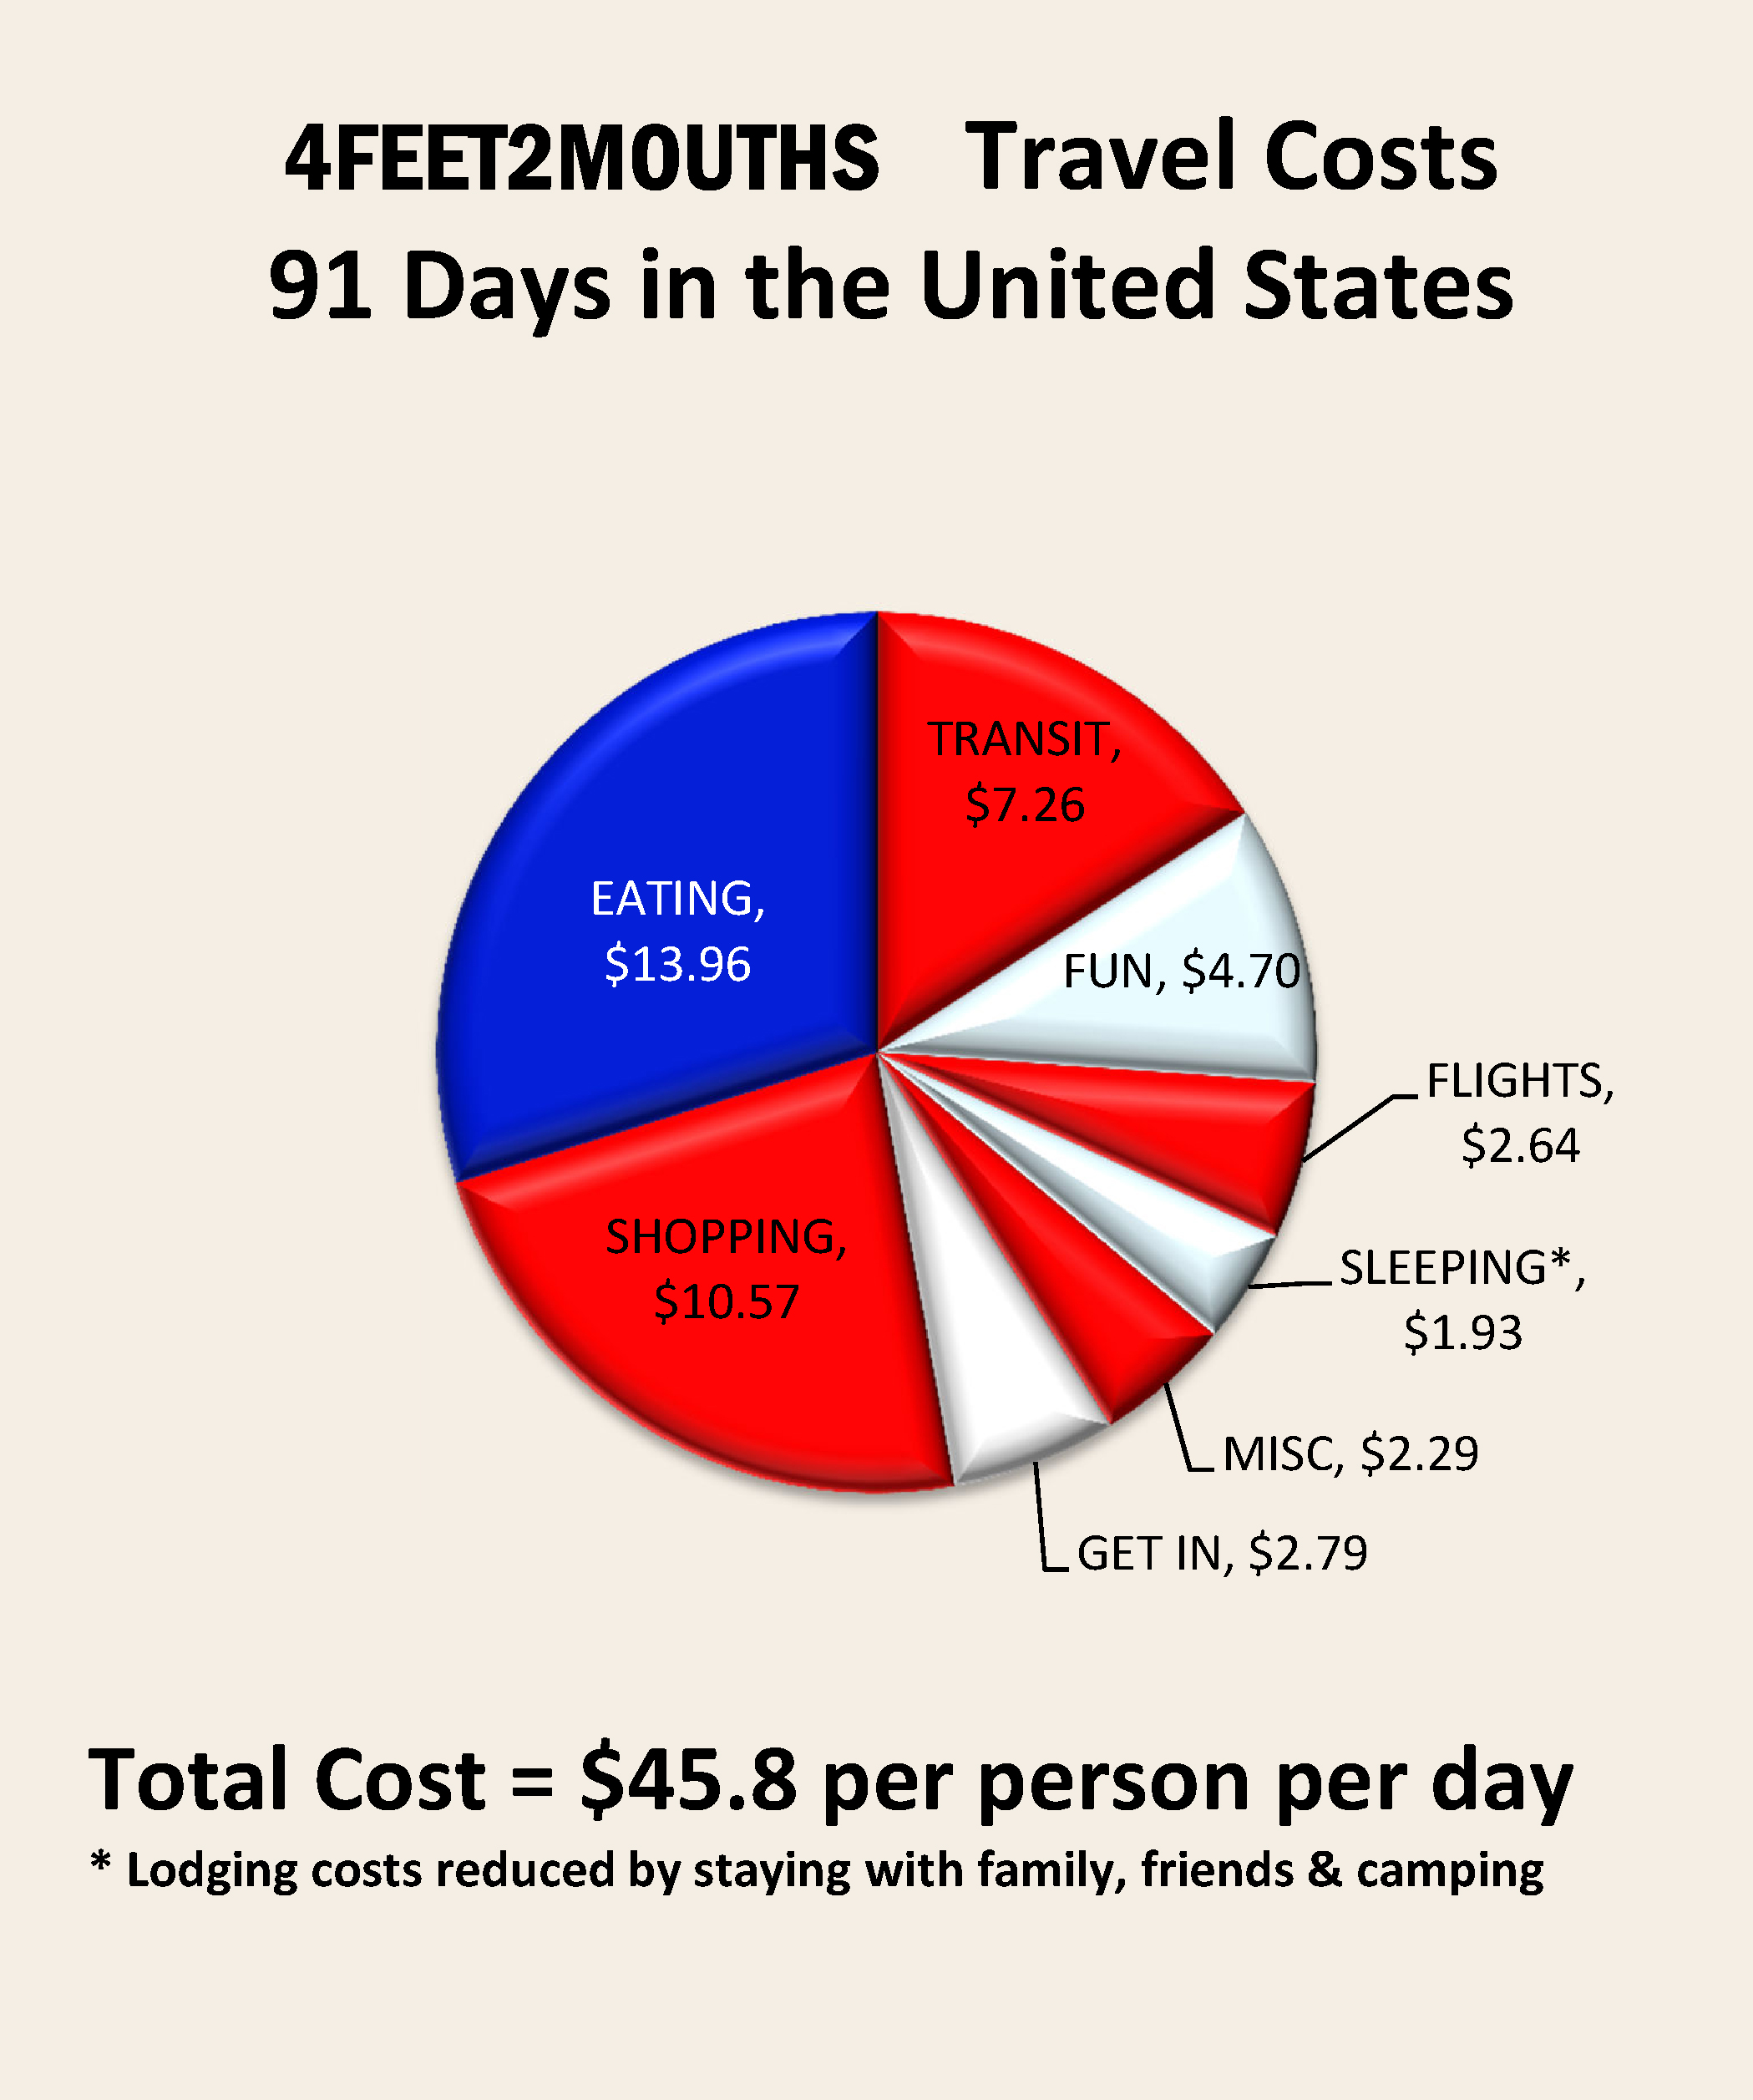
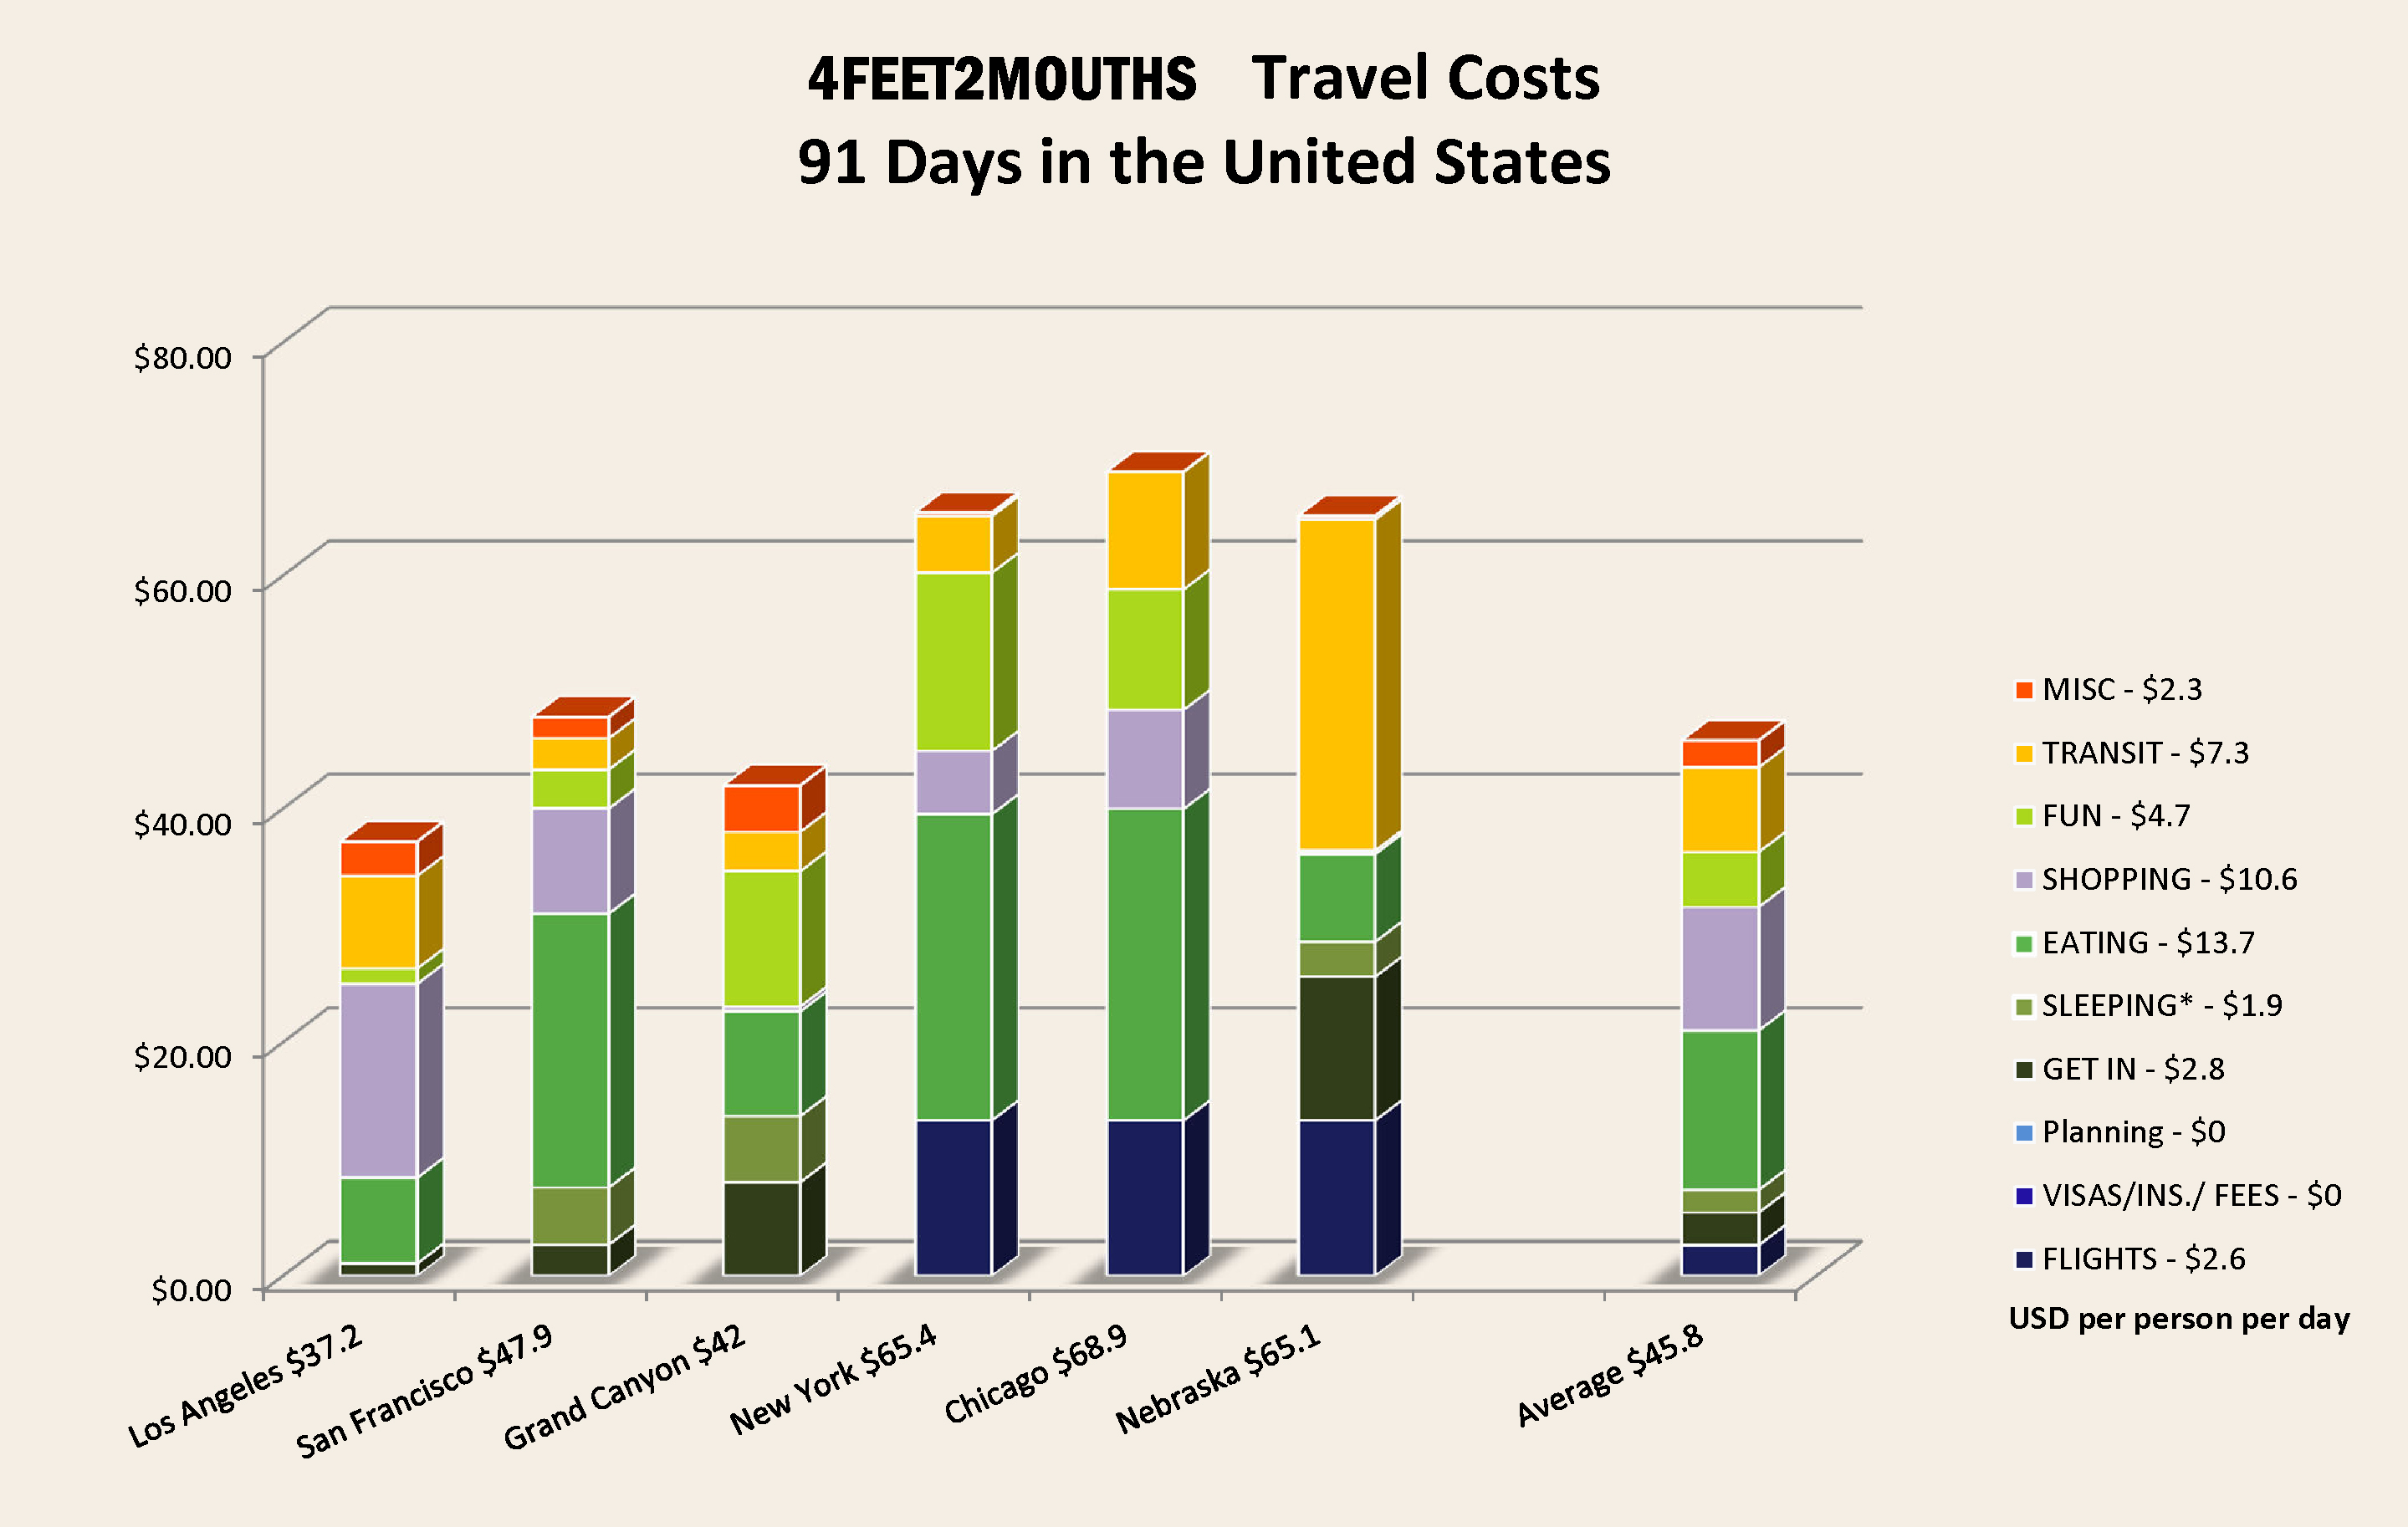
- USA
-

- London
-

- Camino
-

- Madrid
-

- Greece
-

- Turkey
-

- India
-

- Thailand
-

- Cambodia
-
- Vietnam
-
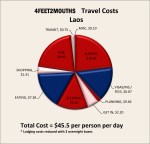
- Laos
-

- China
-
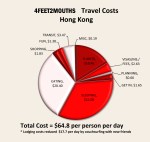
- Hong Kong
-

- TOTAL